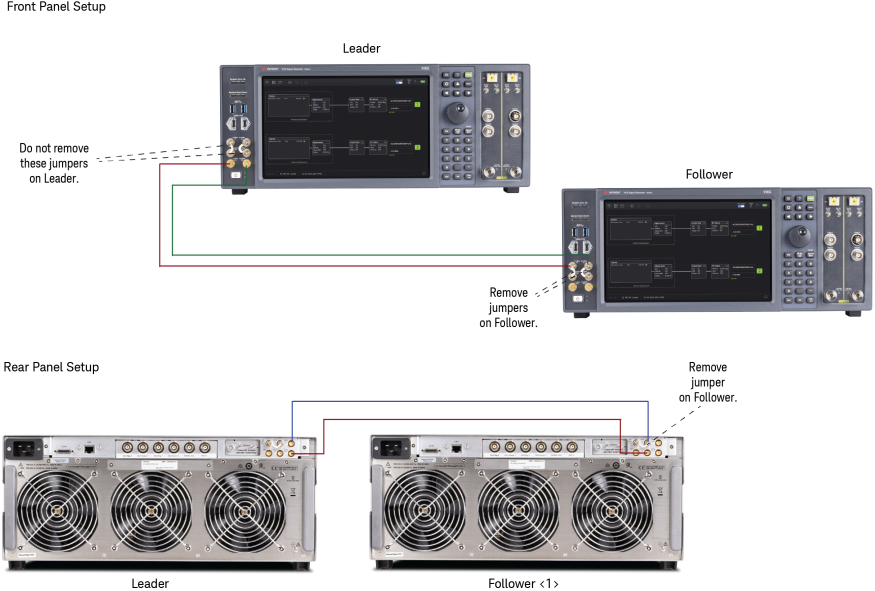
This topic describes how to make cable connections between Leader and Follower(s) in a multi-instrument setup using the Basic Sync cabling method.
This cabling method uses the rear-panel SClock and Strig connectors of the instrument.
Front Panel Cabling
-
On each follower, disconnect the jumper between the 19.2 GHz In and 19.2 GHz Out connectors. Repeat if there is a second 19.2 GHz jumper.
-
On each follower, if present, disconnect the jumper between the 2.4 GHz In and 2.4 GHz Out connectors.
Jumper removal and connection should be performed when the signal generator is powered off.
-
Retain jumpers on the 19.2 GHz ports and 2.4 GHz ports on the Leader. The Leader must have 2.4 GHz port if any of the Followers has this port.
-
Connect the 19.2 GHz Out port of the Leader to 19.2 GHz In port of Follower.
-
If any of the Followers has 2.4 GHz In port, then you must connect the 2.4 GHz Out port of the Leader to 2.4 GHz In port of Follower.
For configurations containing more than one Follower instrument, the use of a splitter or an amplifier depends on the power level required at each Follower input and the resulting signal level after accounting for cable and distribution-network losses. See
M9484C Connectors for the applicable connector input and output power specifications before selecting a reference-distribution method.
For optimum RF performance in a multi-instrument setup, use equal-length cables for equivalent signal paths and maintain a thermally stable operating environment.
Example - Multi-instrument setup for one Follower with 19.2 GHz and 2.4 GHz ports
The Follower has a 2.4 GHz port. Therefore, a 2.4 GHz connection is set up between the Leader and Follower. If the Follower does not have a 2.4 GHz port, then this connection is not needed.